Burger lovers! Are you dreaming of a juicy, mouthwatering burger but trying to stick to your healthy eating goals? Well, I've got some exciting news for you! This Burger Bowl Recipe is about to become your new best friend in the kitchen. Our mouthwatering Burger Bowl Recipe transforms all those incredible burger flavors you're craving into a satisfying, guilt-free bowl that'll make your taste buds dance and your waistline happy.
You know that moment when you're torn between wanting to indulge in a big, juicy burger and staying true to your low-carb lifestyle? That's exactly why I fell in love with creating the perfect Burger Bowl Recipe. It's like having the best of both worlds - all the savory, delicious components of your favorite burger, minus the carb-heavy bun. We're talking perfectly seasoned ground beef, fresh, crisp vegetables, melty cheese, and yes, even that special sauce you can't resist!

Why You'll Love This Burger Bowl Recipe
Let me tell you why this Burger Bowl Recipe is about to become your new favorite dinner option! First off, forget everything you think you know about "healthy alternatives" - this isn't your typical bland diet food. Our Burger Bowl Recipe has taken everything amazing about a traditional hamburger and given it a fresh, modern twist that health-conscious food lovers can't get enough of!
Want to know the best part about this Burger Bowl Recipe? You get to play chef and make it exactly the way YOU want it! Love extra cheese? Pile it on! Can't get enough pickles? Go crazy! It's just like building your perfect burger, but in a bowl that's packed with even more goodies. And for all my meal prep warriors out there - this recipe is about to make your life so much easier. You can prep everything on Sunday and feel like a total kitchen boss all week long!
Jump to:
- Why You'll Love This Burger Bowl Recipe
- Ingredients
- Burger Bowl Recipe Instructions
- Helpful Tips
- Dietary Benefits & Serving Suggestions
- Recipe Variations & Substitutions
- Equipment For Burger Bowl Recipe
- Storage Instructions
- Top Tip
- Grandma's Magic Touch
- FAQ
- How did your Burger Bowl Recipe turn out?
- Related
- Pairing
- Easy Burger Bowl Recipe
Ingredients
Let's gather everything we need to make your amazing Burger Bowl Recipe! I'll break this down into two parts to make it super easy to follow.
For That Perfectly Seasoned Burger Base:
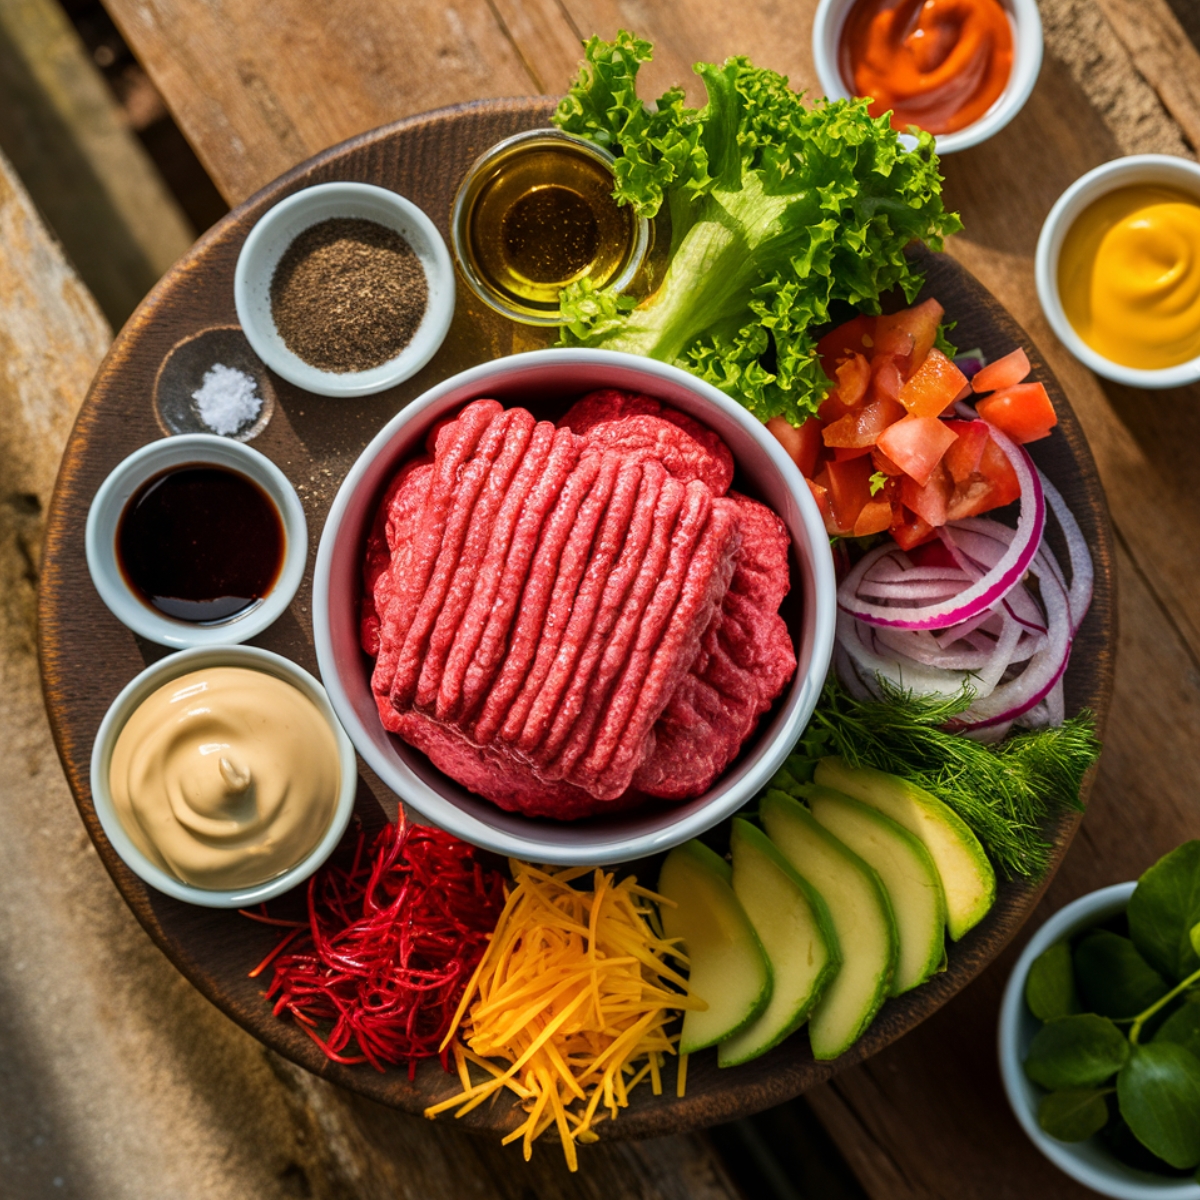
- 1 pound ground beef (grab that 80/20 blend - trust me, it's the secret to incredibly juicy meat!)
- 1 tablespoon olive oil (just enough to get that beautiful sear)
- 1 teaspoon garlic powder (because what's a burger without garlic?)
- 1 teaspoon onion powder (the dynamic duo with garlic - they're best friends!)
- 1 teaspoon sea salt (don't skip this - it brings all the flavors to life)
- ½ teaspoon black pepper (fresh ground if you're feeling fancy!)
- 1 tablespoon Worcestershire sauce (our secret weapon for that classic burger taste)
Now for the Fun Part - Bowl Assembly Time!
- 4 cups fresh lettuce, chopped (any kind you love - romaine gives a nice crunch!)
- 2 tomatoes, diced (the juicier, the better!)
- 1 red onion, thinly sliced (pro tip: soak in cold water for 5 minutes to mellow the bite)
- 2 dill pickles, chopped (extra if you're a pickle fan like me!)
- 1 cup cheddar cheese, shredded (or get wild with your favorite cheese)
- 1 avocado, sliced (because everything's better with avocado)
- 4 tablespoons mayo or special sauce (want my special sauce recipe? Keep reading!)
Optional But Awesome Add-ins:
- Your favorite mustard (dijon adds a fancy touch!)
- Sugar-free ketchup (keeping it keto-friendly)
- Any other toppings that make your burger-loving heart happy!
Burger Bowl Recipe Instructions
Ready to create your mouthwatering Burger Bowl Recipe? Let's break this down into three super-easy steps that'll have you feeling like a pro chef in no time!
Step 1: Prep Party Time!
- Let's get our veggie prep out of the way first! Chop up all those colorful vegetables and pop them aside. (Pro tip: This is a great time to put on your favorite song and have a little kitchen dance party!)
- Now for the star of our Burger Bowl Recipe - let's make that meat amazing! In a large bowl, mix your ground beef with the garlic powder, onion powder, salt, pepper, and that flavor-boosting Worcestershire sauce. Just use your hands to mix it gently - think of it as playing with fun, savory playdough!
- Split your seasoned meat into four portions - no need to be super precise, but try to make them roughly equal. (If you're a perfectionist, you can totally use a kitchen scale!)
Step 2: Let's Get Cooking!
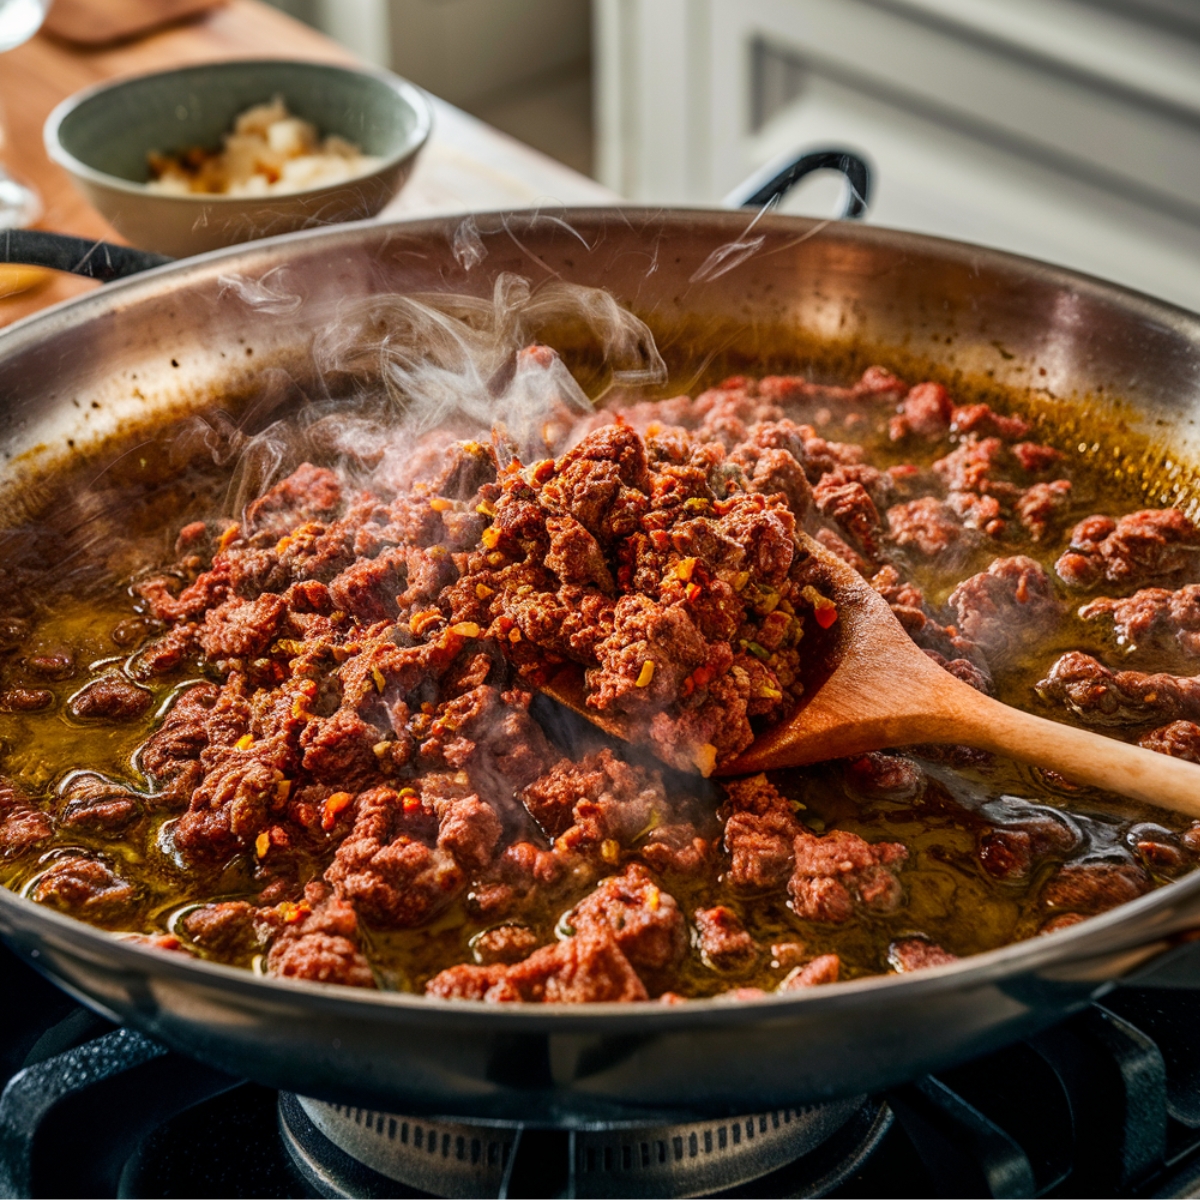
- Time to heat things up! Warm that olive oil in a large skillet over medium-high heat until it's shimmering and ready for action
- In goes your perfectly seasoned ground beef - listen for that satisfying sizzle!
- Grab your wooden spoon and break up the meat as it cooks. Think of it as a delicious meat puzzle - you want nice, bite-sized pieces
- Give it about 8-10 minutes of your time, stirring occasionally until it's beautifully browned and cooked through. Your kitchen should smell absolutely amazing right now!
- If you're watching your fat intake, you can drain off the excess - but remember, that's where lots of flavor lives!
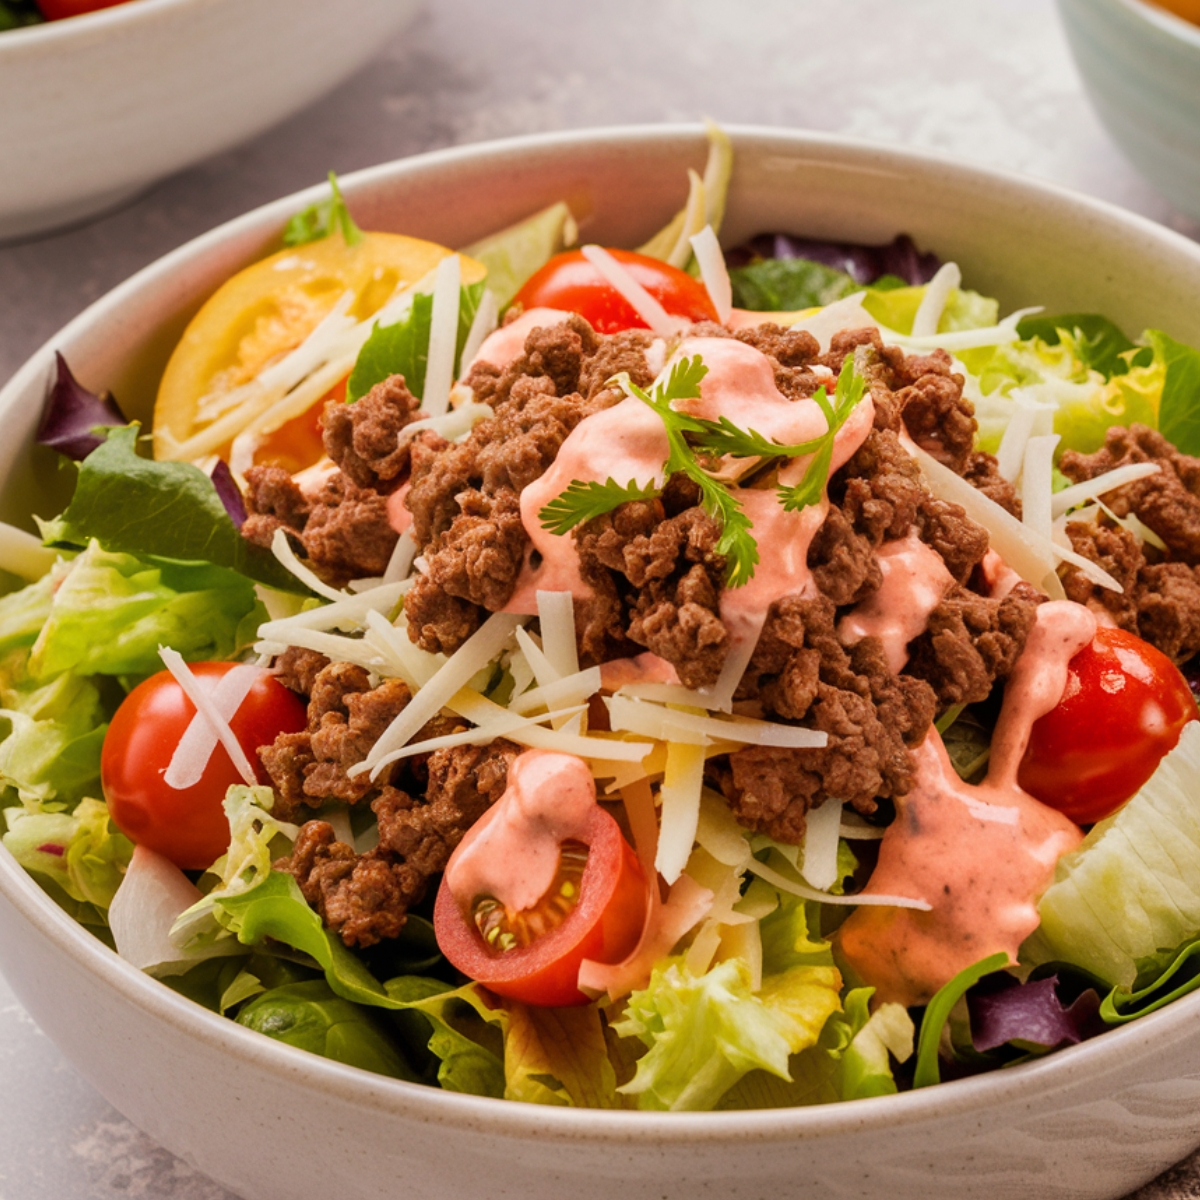
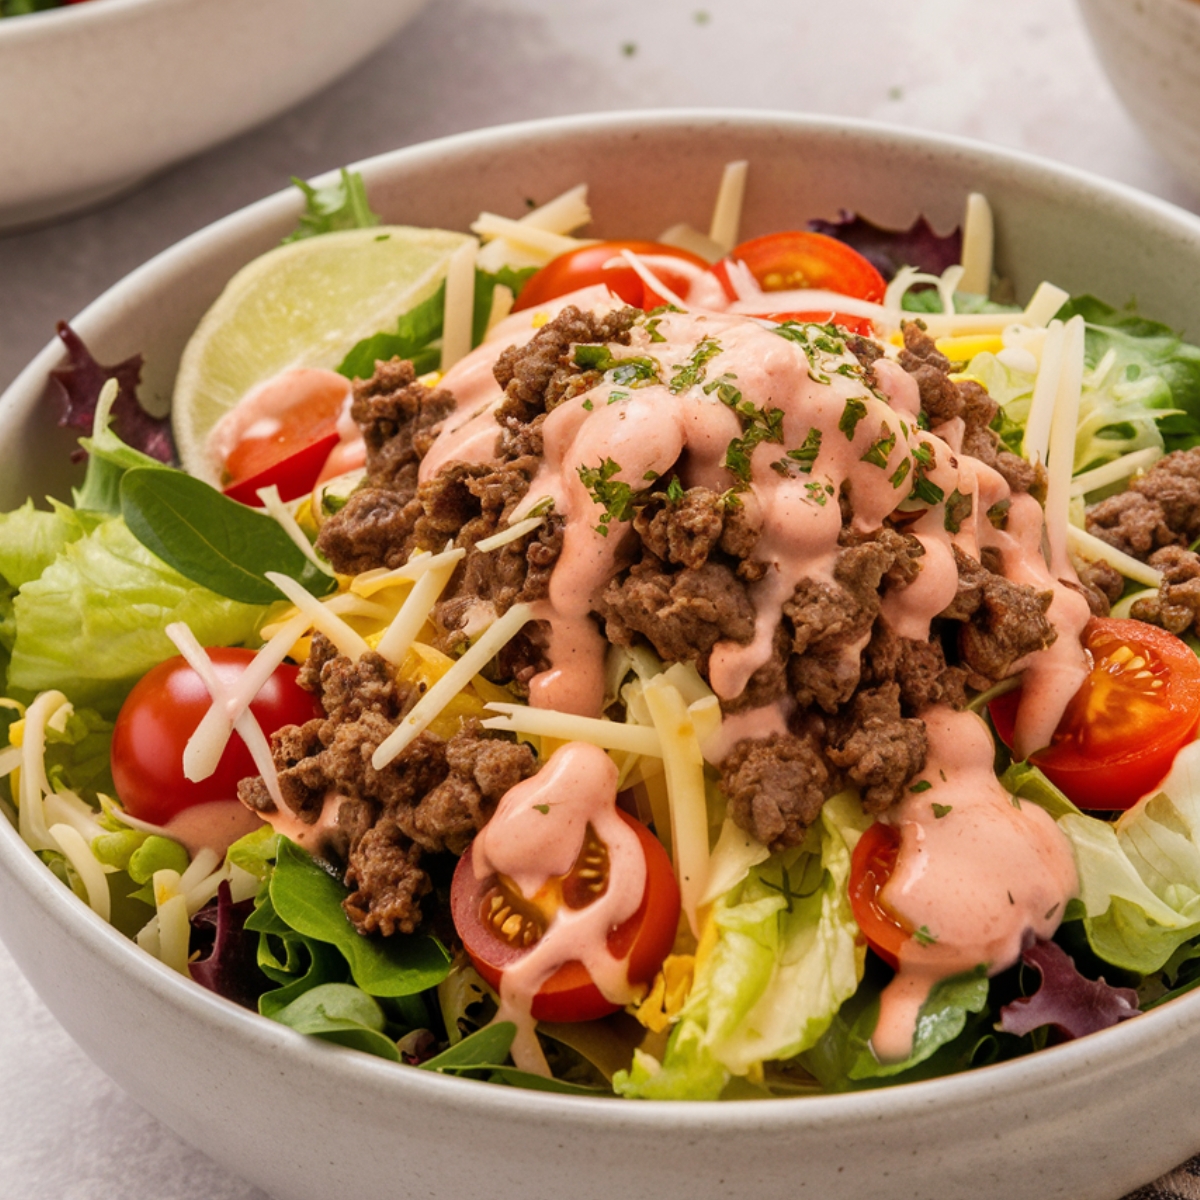
Step 3: The Fun Part - Bowl Assembly!
- Start by creating a comfy bed of fresh lettuce in each bowl - this is the foundation of your masterpiece!
- Add your hot, seasoned beef right in the center - it's like the crown jewel of your Burger Bowl Recipe
- Now for the artist in you - arrange those colorful tomatoes, onions, pickles, and avocado around the beef. Make it pretty - we eat with our eyes first!
- Time for the cheese! Sprinkle it over the warm beef and watch it get all melty and delicious
- Drizzle with mayo or your special sauce - get creative with those zigzags!
- Final touches! Add a squirt of mustard and sugar-free ketchup if that's your jam
Helpful Tips
- For the juiciest burger meat, avoid overworking the ground beef when mixing in seasonings
- Let the meat sear on one side before breaking it up to develop better flavor
- Prep all toppings while the meat is cooking to save time
- Warm the bowls slightly before adding hot meat to keep everything at the perfect temperature
Dietary Benefits & Serving Suggestions
This Burger Bowl Recipe is naturally low-carb and keto-friendly, containing approximately 5g net carbs per serving. It's high in protein and healthy fats, making it perfect for those following a ketogenic or low-carb diet. For a complete meal, consider serving with:
- Roasted cauliflower
- Air-fried zucchini sticks
- A side of sugar-free coleslaw
Recipe Variations & Substitutions
- Turkey Burger Bowl: Use ground turkey instead of beef for a leaner option
- Vegetarian Version: Substitute the meat with grilled portobello mushrooms or plant-based ground meat
- Spicy Option: Add jalapeños and pepper jack cheese
- Mediterranean Style: Top with feta cheese, olives, and tzatziki sauce
Equipment For Burger Bowl Recipe
- Large skillet or cast-iron pan
- Mixing bowls
- Sharp knife and cutting board
- Wooden spoon or spatula
- Measuring spoons
Storage Instructions
Store components separately in airtight containers:
- Cooked meat: keeps for 3-4 days in the refrigerator
- Chopped vegetables: store for 2-3 days
- Assembled bowls: best eaten within 24 hours
- Freeze cooked meat for up to 3 months
Top Tip
Let your meat come to room temperature before cooking for more even cooking and better browning. This simple step makes a big difference in the final taste and texture of your Burger Bowl Recipe.
Grandma's Magic Touch
You know how grandmas have that special way of making everything taste like a warm hug? Well, this Burger Bowl Recipe has a sprinkle of that same cozy magic! When I first told my grandmother I was creating a Burger Bowl Recipe, she was skeptical about skipping the bun, but after one taste, she declared it "even better than the original!"
My grandmother always said, "The secret to the best Burger Bowl Recipe isn't just in the ingredients - it's in the love you stir into them." And boy, was she right! Every time I make this Burger Bowl Recipe now, I can hear her gentle reminders in my head, guiding each step.
Her special touch? She'd always warm the skillet just a tiny bit longer than everyone else, letting it get perfectly hot before adding the meat. "Listen for the sizzle, dear," she'd say with a wink. "When it sounds like rain on a tin roof, that's when you know it's ready!" Then she'd add the seasoned ground beef and let it develop that gorgeous golden crust before breaking it up - patience was her secret ingredient!
FAQ
What's the best way to cook the patties for bowls?
The best way to cook patties for bowls is to sear them in a hot cast-iron skillet or grill for 4-5 minutes per side for medium doneness. Season generously with salt and pepper before cooking, and avoid pressing down on the patties to retain juiciness. Cook until the internal temperature reaches 160°F (71°C) for food safety.
What does Gordon Ramsay put in his burger patty?
Gordon Ramsay's signature burger patties contain ground beef (80/20), salt, black pepper, and olive oil - nothing else. He emphasizes that adding too many ingredients masks the meat's natural flavor. Ramsay seasons the outside of the patties just before cooking and allows the meat to come to room temperature first.
Do you eat burger bowls cold?
Burger bowls can be enjoyed either hot or cold, making them perfect for meal prep. While the patties are typically served warm for the best flavor and texture, the assembled bowl can be refrigerated and eaten cold like a burger salad. For the best experience when eating cold, slice the patties thinly before cooling.
Do you mix egg with ground beef for burgers?
No, you shouldn't mix egg with ground beef for traditional burgers. Eggs are unnecessary binders that can make patties too dense and meatloaf-like. For juicy, tender burgers, simply use well-marbled ground beef (80/20), handle it minimally, and season the outside with salt and pepper just before cooking.
How did your Burger Bowl Recipe turn out?
This recipe is sure to impress with its perfect balance of savory seasoned beef, fresh crispy vegetables, and creamy toppings. If you're a fan of healthy comfort food makeovers, be sure to try our Cheesy Potato Soup Recipe or old fashioned stuffed bell peppers recipe or Chicken Fajita Pasta Recipe next - another easy-to-make yet delicious treat!
Did you make this Burger Bowl Recipe? We'd love to hear about your experience! Leave a star rating and share your thoughts in the comments.Did you try any creative twists or use any unique ingredients? Maybe you added some grilled mushrooms or tried a different cheese blend? Your feedback not only helps others but also contributes to our growing community of home cooks. Don't forget to share a photo of your culinary creation!
Related
Looking for other recipes like this? Try these:

Pairing
These are my favorite dishes to serve with Burger Bowl Recipe


Easy Burger Bowl Recipe
Equipment
- Large skillet or cast-iron pan (Non-stick or cast iron works best)
- Mixing bowls (For sauce preparation)
- Sharp knife and cutting board (For slicing vegetables)
- Wooden spoon or spatula (For vegetable prep)
- Measuring spoons (Wide bowls work best for assembly)
Ingredients
For the Burger Base:
- 1 pound ground beef - 80/20 for best flavor
- 1 tablespoon olive oil - For cooking beef
- 1 teaspoon garlic powder - For beef seasoning
- 1 teaspoon onion powder - For beef seasoning
- 1 teaspoon sea salt - Adjust to taste
- ½ teaspoon black pepper - Freshly ground preferred
For the Bowl Assembly:
- 4 cups fresh lettuce - chopped
- 2 tomatoes - diced
- 1 red onion - thinly sliced
- 2 dill pickles - chopped
- 1 cup cheddar cheese - shredded
- 1 avocado - sliced
- 4 tablespoons mayo - or special sauce
- 6-8 slices bacon - cooked and crumbled (optional)
- Mustard and sugar-free ketchup - optional
Instructions
- Mix all sauce ingredients in a small bowl until well combined. Refrigerate until ready to use.
- Heat olive oil in a skillet over medium-high heat. Add ground beef, breaking it into small pieces. Add seasonings and cook until browned (8-10 minutes). Drain excess fat if desired.

- Divide lettuce among four bowls. Top with cooked beef, and arrange tomatoes, red onion, pickles, and avocado around the sides. Drizzle generously with special sauce.
- Enjoy immediately while beef is still warm.

Notes
- For meal prep: store components separately
- Warm only the beef when ready to eat
- Soak sliced onions in cold water to reduce bite


Leave a Reply